|
|
Post by hobbycentric on Jun 10, 2014 16:01:59 GMT -5
I'm really happy with how they fit in there too. Got lucky on the dome fitting on the shelve though. The site said it's a 9.75 inch by 10 inch dome. They must measure by interior dimensions. I used a 24 X 10 shelve, cut it in half, and produced two individule shelves that way. They are 10 inches wide by 12 inches deep. I put the bare side to the wall. The thickness of the glass makes the dome just a hair smaller than 10 inches in diameter....so it just squeaks by on fitting in there.
The large case also is finished for the other display. Tried picking it up on the way home from work but it just doesn't quite fit in the car. So I'm going to have to get some help with getting that one home. They finished it early by three weeks which surprised me.
|
|
|
|
Post by finalgear on Jun 11, 2014 9:46:46 GMT -5
^-- i seen those bubble dome case at Hobby Lobby, if you need get more (print out Hobby Lobby coupon too)
you r running out of shelve space ^_^
|
|
|
|
Post by hobbycentric on Jun 11, 2014 18:23:18 GMT -5
Yep, those two shelves are now full by my standards. That's why the case will be going on them when I can finally get it home. I'll give all the figures a light dusting as well as the shelves and then locate the mount points in the wall for the case so I can install anchors to put screws in to mount it up there.
I was supposed to get help bringing the case home today after work. A coworker was going to help doing so with the use of his truck. Unfortunately, one of life's sidetrips came into play. I've just refinanced my home and the bank left some info off one of the forms. I had to go there after work to resign the updated document instead. Ofcourse, one's home is much more important than a case that can be picked up after work tomorrow.
|
|
|
|
Post by finalgear on Jun 12, 2014 7:58:48 GMT -5
I've just refinanced my home and the bank left some info off one of the forms. I had to go there after work to resign the updated document instead. Ofcourse, one's home is much more important than a case that can be picked up after work tomorrow. Just refinanced my house awhile back.... it's o·ver·whelm·ing  lucky.. my rep... dumb-it down the process to my level... however my house's insurance.. rates WTF? If you magically... get a check $$$ from your previous mortgage... THAT IS NOT PLAY MONEY!!!! that will be most likely your left-over from your ESCROW, which pays for your house's insurance and TAXES.. you need to put that back into your NEW ESCROW (BE SMART)  |
|
|
|
Post by Nutz on Jun 12, 2014 8:18:53 GMT -5
LOL. At least you refinanced before the rates went back up.  |
|
|
|
Post by hobbycentric on Jun 12, 2014 15:08:34 GMT -5
Nah, I don't have to worry about any extra money comming back at me. I pay my own home insurance each month and my own property taxes. In reality, for me it isn't too much. My property taxes are just under $600 each year. My insurance, combined with the car, is $125 a month. So it's not an issue at all. The big deal is both the drop in payment and the fact that a hidden balloon payment that was in there is now gone PLUS the ex is now off the mortgage after three years. I can now officially and LEGALLY start upgrading the exterior of the home. I had a new roof put on right off the bat and the company that did so asked nothing about ownership, etc. Companies that I had look at siding and windows though...they asked if I was married, then divorced. Once they found out I was divorced AND that she was still on the mortgage they wouldn't touch it for liability reasons. They said I'd have to get her signature on the paperwork..which she lives 1500 miles away in her home state. So, I concentrated on the one place I could work on it, the interior. I've put almost $22,000 on the inside and it needed it badly. Still have the master bath and the utility room to redo. The rest is completely remodeled and looks nothing like it did...which was a trash dump when she moved out. I've done this all on my own over 3 years and without any loans or credit card debt. I find it amazing that suddenly I have money and when we were married there never was.
Anyhow....that's a side trip that has nothing to do with the subject of the boards. I got the show case / cover home today with help of my coworker. I'll get it up and on the shelves this weekend. It is by no means heavy since it is arcrylic plastic but the size makes it akward. At 47 1/2 wide, by 28 1/4 tall and 11 1/2 deep...it's pretty big. It only cost $153.00 to have made though.
|
|
|
|
Post by hobbycentric on Jun 14, 2014 9:57:45 GMT -5
Well, after some serious and yet delicate battle with a big chunk of plastic, here is the result. Sorry about the lack of lighting. Couldn't use flash because of all the reflective surfaces and I did try doing the picture with all versions of the lights on and off that I could. I had to settle on one set of lights and then adjusting the light level in my photo program.  The second photo is an upclose of one of the mounting tabs with an insert of the tab enlarged. Pretty simple concept. Just 4 1 inch by 1 1/2 inch tabs that are 3/8th of an inch thick. I put plastic anchors in the wall and drug it up snug to the wall itself. 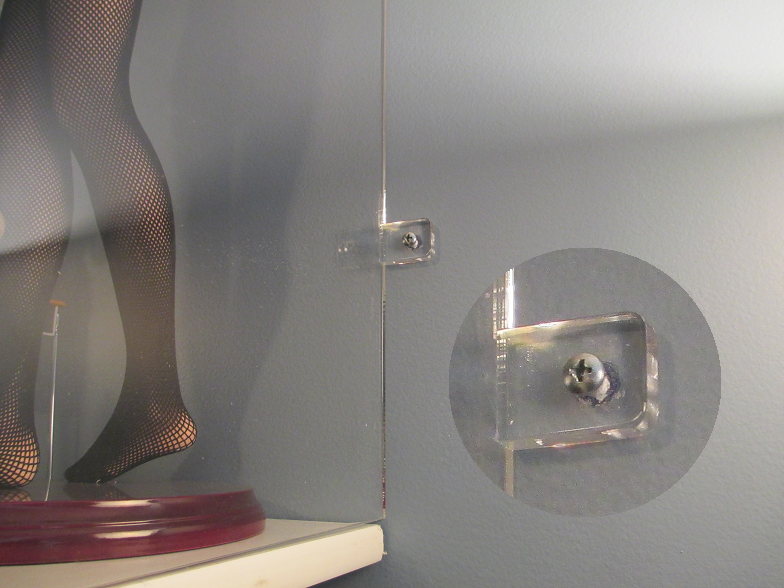 I don't know for sure about a lighting system but I think I might do what I did above my kitchen cabinents when I remodeled those. I put mirror cut to fit in the recesses, plate glass cut to the size of the cabinent tops themselves and put LED christmas lights in between. Worked well. In this case, I might get some fake ivy from a craft store, entertwine some christmas lights with it and drape it over the case so it hangs down both sides. It would hide the tabs that way and there would be a simple way to have lights as well..... |
|
|
|
Post by hobbycentric on Jun 14, 2014 10:12:41 GMT -5
Two new arrivals just hit the door as well.  AmiAmi is so, soooo very much better than Ebay. |
|
|
|
Post by Nutz on Jun 15, 2014 19:21:52 GMT -5
Man, pretty awesome pics! It sounds to me like you're much happier w/ your life after the divorce. Life is good!  |
|
|
|
Post by finalgear on Jun 16, 2014 8:54:02 GMT -5
WOW... love your case. I thought you we're getting a different shelf
|
|
|
|
Post by hobbycentric on Jun 16, 2014 19:00:28 GMT -5
Nah, there was no need for a new shelf. I long ago learned to repurpose what I have to save money whenever possible. That room is actually the smallest of three bedrooms in the home. When the home was first built, it served as a hobby room for about three years. I also build models, although I haven't built seriously for about 5 or 6 years now. I started building in 1984 though. That shelf was originally above my build desk and served to hold paints, tools, supplies, my two airbrushes, etc. When I was forced to give up the room and it simply became a junk/storage room, the shelf was moved out to the garage and shoved unceremosiouly into a corner. I dug it out, cleaned it up and bought heavier, new brackets. That room currently is my personal room even though it is the smallest. It's in the back of the home, and quiet.
The master bed room is at the point of needing new carpet but otherwise done. It will be done in early American history motif. I already have two large tall ships of the era, the U.S.S. Constitution and U.S.S. Constellation. It will have other things such as a bust of George Washington and Ben Franklin, that sort of thing....
The second largest bedroom is the guest room, office, sports den. All Green Bay Packers theme and has a fold down fouton couch and such.
But the case for the figures, it kind of serves as a potential pattern as well for the tall ships which are still in their shipping boxes after a year and a half since I recieved them. Dusting all that rigging and such makes me shudder!
I've repurposed a ton though..I pulled up all the trim and painted it a slight off white as well as the doors and window trim. Saved a huge amount of money that way instead of having to replace all the trim throughout the home.
|
|
|
|
Post by finalgear on Jun 24, 2014 11:37:29 GMT -5
I also build models, although I haven't built seriously for about 5 or 6 years now. I started building in 1984 though. That shelf was originally above my build desk and served to hold paints, tools, supplies, my two airbrushes, etc.  yep.. i know what you mean... I haven't work on any of my model cars or finish one in years.. partially because " Revell" when to shiiiixxxxxx |
|
|
|
Post by Nutz on Jun 25, 2014 7:32:54 GMT -5
speaking of revell, i've got a bunch of unbuilt kits myself.  |
|
|
|
Post by hobbycentric on Jun 28, 2014 7:01:20 GMT -5
Been a busy week and a half. Getting ready for a trip and such. Have a few more figures on order and coming though. Since we are discussing model building off topic though I thought I would share my last big project from back in 06'. My father was a fighter pilot in the late 50s in the Air Force ( one of my insperations for why I went in ). He flew the F-86D Sabre Dog. Back when I first started workin in 1986 I built a small model of one from Airfix. He kept it for many years and then finally one of the cat's knocked it over and broke it. He sat it aside. In 2003, he asked me if I could rebuild it and gave it back. It got put on the back burner becuase of life. He would ask every now and then. I picked up a larger 1/48th scale in 2005 and then started looking for after market decals for the old Airfix kit as well. In 2006, I was on Ebay ( our best friend eh? ) an came across a control panel from an F-86D. Specifically part of the panel that controls the rocket rack for the "Mighty Mouse" rocket launcher system as well as other systems. Well, I bought that puppy. I started drawing up a concept after I gathered all the things I needed to make the project come together. I have a coworker who does his own woodworking on the side. He made the cabinent and his wife did the cloth work using fabric that makes up the flight suits of the Thunderbirds. Anyhow, here are a few pics of it. it's the only time I've ever seen my father speechless. 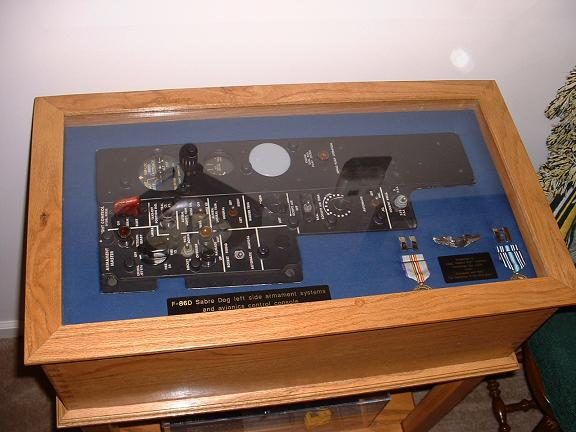 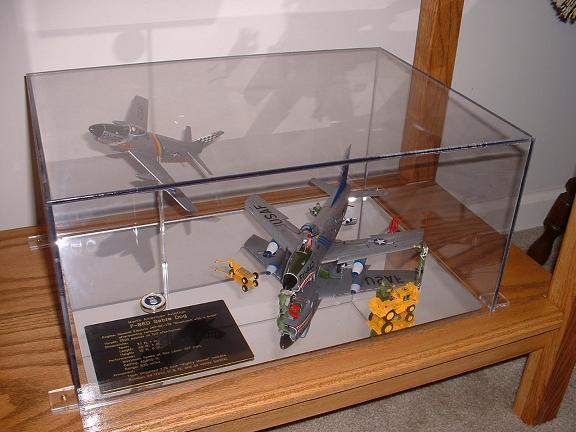 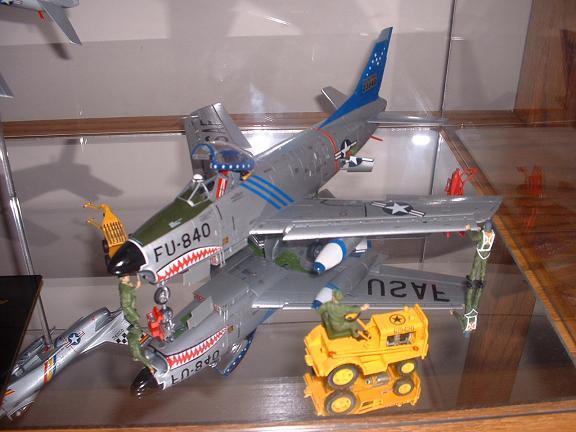 I spent about 5 months total reworking mainly the figures which came from B-17 kit and were not meant to fit or be postioned in the way they are. The pilot was originally sitting, so I had cut him apart, reglued him and filled the seams in his joints. Put a new head on him because I used his originall head to hollow out the helmet and put it on the wind screen in "alert status". I came up with that idea scouring the net for images of the D model. There was a photo of a line of them with pilots scrambling for a launch and their helmets were all sitting up on the windscreen like that. When dad was stationed in Alaska for bomber intercept missions, he said that's what they would do. Scratch built the little tool box for the mechanic. Just had a blast working out all the details including the information plaques and such. Good fun. |
|
|
|
Post by Nutz on Jul 1, 2014 8:01:02 GMT -5
Wow, your work is AMAZING! Wish I had half your ability. lol
|
|